The 15 Best Exercises to Build Your Back
The only things that most guys focus on are the things they can see right in front of them.
That holds true in most contexts throughout life; at work, at home, and most especially, in the gym. But I'm here to change that.
For far too long you've probably been distracted by what's directly in your line of sight when you check yourself out in the mirror. Meanwhile, there's a whole world of potential gains just waiting to be had around the other side.
You should be working out your back just as hard as your front, and dedicating just as much time and effort to the things you can't always see. Building up your back is more beneficial than just checking off another box on your full body schedule. Once you get going, your posture will improve, as your weak, once-ignored muscles grow, so your desk-hunch will be less pronounced when you're away from the office.
Your back can also play a large role in boosting strength for other lifts you might not expect, like the bench press. The muscles in your upper- and mid-back help stabilize your shoulder joints. The stronger and more stable your shoulders, the more weight you can lift in just about every upper-body exercise.
Since many back exercises require you to use your arms for pulls and rows to activate the muscles, working your back is also great for targeting your arm muscles. Even though you're focused on your rear, your front gets to benefit, too.
Are you fixated on your front because you're yearning for V-shaped torsos? You're not going to get there without homing in on the back. If that's all you're looking to do, check out this workout—but you should probably be motivated to look beyond just attaining that V.
Now, are you ready to work your back more? Get started with some of my favorite exercises to work your entire back.
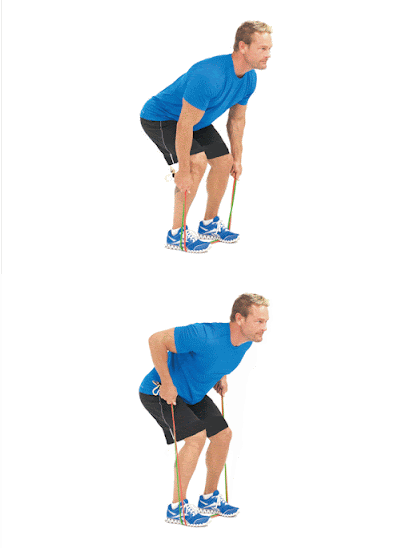
1. Band Bent-Over Row
DO THIS: Grab a low-resistance band and set it out on the ground. Stand in the middle of the band, grabbing the two ends in either hand with a pronated (overhand) grip, hinging at the hips, and slightly bending your knees in an athletic stance. Make sure that your back isn't rounded.
Squeeze your back to pull the band ends simultaneously to your chest, or as close as the band allows. Pause for a moment at the top of the motion, then slowly return to the original position, working against the band's resistance.
2. Renegade Row
DO THIS: Grab a pair of light dumbbells and about as much space as you would need to perform pushups. Get in a plank position with your feet spread wide, gripping the dumbbells with your palms facing parallel to each other. Squeeze your glutes and core to maintain a strong spinal alignment, looking at the floor ahead of you.
Use your lats to row one of the dumbbells to chest height, then return the weight to the ground, keeping the rest of your body balanced in its position. Control the load up and down the movement — if you have to contort your body and shift your back to lift the dumbbells, drop down to a lower weight. Perform a pushup, maintaining spinal alignment, and repeat the motion with the opposite arm.
3. Dumbbell Single-Arm Row
You also have the benefit of working both sides of your body, allowing you to work through weak spots by focusing on building up strength imbalances.
DO THIS: You only need one dumbbell to do the job here. Old school heads would require you to mount the bench with your weight on your opposite knee and hand, planting the same side leg on the ground—but if you don't know exactly what you're doing and have full control of the weight, you could be putting your spine in jeopardy. Instead, stand close to the bench, square your feet, and plant your palm on the platform. Bend at the hips, and keep your back straight, picking up the dumbbell with your work hand and allowing it to hang straight down from your shoulder.
Pull the dumbbell up to the side of your torso without rotating your shoulders or losing your balance. Pause for a count at the top before lowering the weight to the starting position.
4. Chest-Supported Dumbbell Row
If you struggle with keeping your chest strong and your spine straight when you try bent-over exercise variations, you'll love this movie. The chest-supported row isolates your back and lets a bench do the work, allowing you to concentrate on moving the weight more efficiently.
DO THIS: Sit on an incline bench with your chest forward, resting on the support. Grab dumbbells with a neutral grip, keeping your chest strong and allowing your arms to hang.
Squeeze your back to pull the weights to your hips, with your elbows bent at 90-degree angles. Squeeze your shoulder blades for one to two seconds maintaining your position, then return to the starting point.
5. Inverted Row
Wrong. If you've never tried the inverted row before, you're in for a surprise. The move is a killer upper back driller that will tire you out sooner than you'd expect from its basic setup.
DO THIS: Place a bar at about hip height on a Smith machine or power rack. Lower yourself to the ground underneath the bar, grabbing it with an overhand grip with your hands positioned directly above your shoulders. There should be some space beneath your back and the ground to hang suspended. You can fully extend your legs and rest your heels on the ground for a challenge, or bend your knees and plant your feet on the ground for an easier rep.
Pull your shoulder blades back to start the rep, then pull up with your arms to lift your chest to the bar. Keep your wrists stable and maintain a straight line in your spine, squeezing your glutes. Touch your chest to the bar before straightening your arms to return to the starting position.
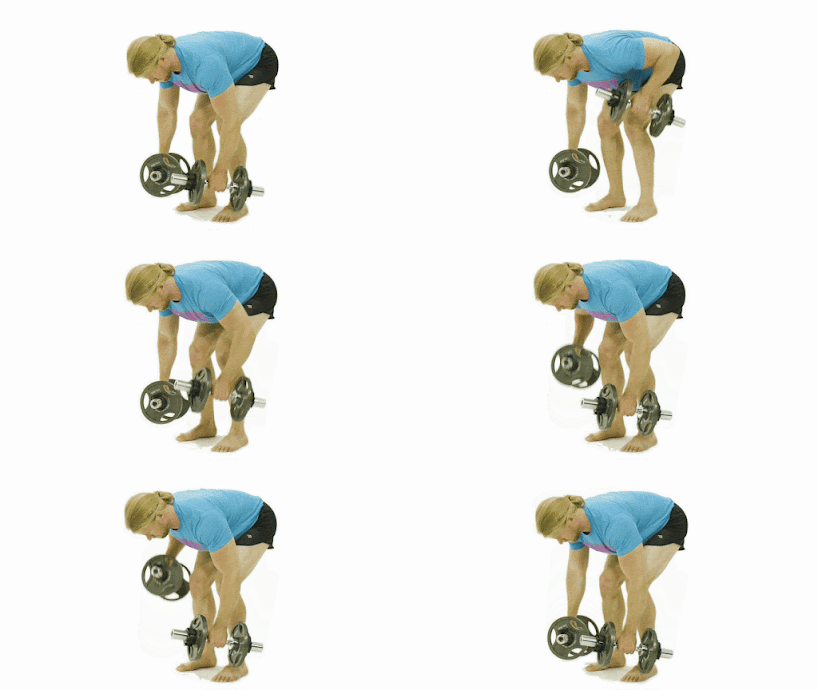
6. Bent-Over Dumbbell Alternating Row
DO THIS: Grab a pair of dumbbells, hinge at your hips and knees, and lower your torso until it’s almost parallel to the floor. Your feet should be shoulder-width apart, and your lower back should be naturally arched; just make sure to avoid rounding your lower back.
Let the dumbbells hang at arm’s length from your shoulders with your palms facing each other. Keeping your position, lift one dumbbell to your side, pause at the top of the movement, and slowly lower it. Then repeat with your other arm.
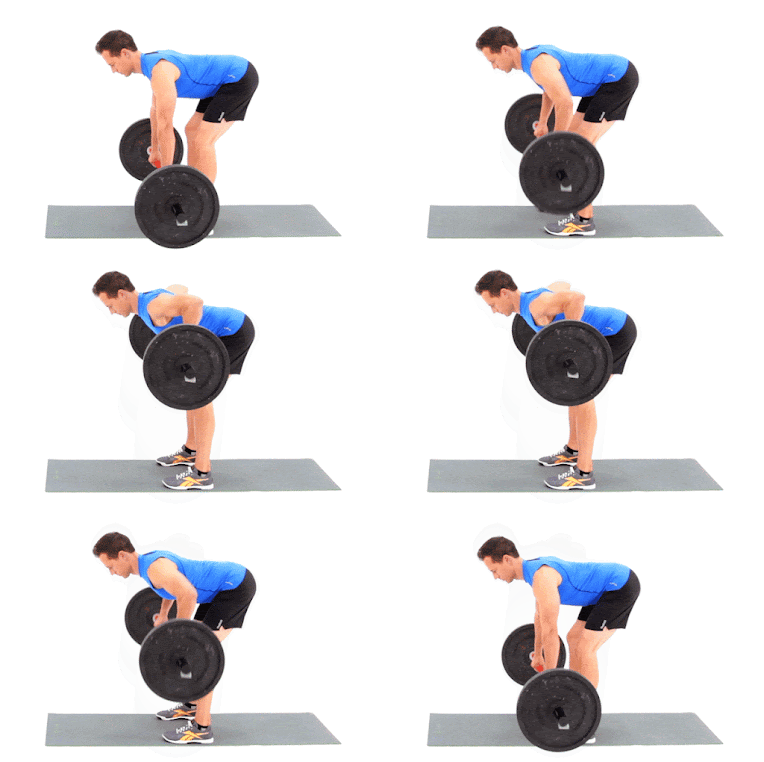
7. Bent-Over Barbell Rows
The barbell row is a go-to exercise to work your middle back muscles. Just be careful to use proper form and don't overload the bar.
DO THIS: Grab the barbell with a pronated (overhand grip), holding your hands just further than shoulder-width apart. Hinge at the hips and knees and lower your torso until it’s almost parallel to the floor. Keep your back naturally arched, and make sure to avoiding rounding. Pull the bar to your upper abs and squeeze your shoulder blades toward each other. Pause, then slowly lower the bar back to the starting position.
8. Bent-Over Underhand Barbell Row
If you think this movie looks familiar, you're not wrong—it's exactly the same as the move above with one key difference: Grip.
Use a supinated (underhand) grip to target your rhomboids, the small muscles that start at your spine and attach to your shoulder blades. They assist your traps with pulling your shoulder blades together. These muscles tend to be weak due to the long amount of time we spend sitting at desks, in cars, or on couches every day.
DO THIS: Grab a barbell with an underhand grip that’s just beyond shoulder width, and hold it at arm’s length. Lower your torso until it’s almost parallel to the floor, and bend at your hips and knees. Let the bar hang at arm’s length. Pull the bar to your upper abs as you squeeze your shoulder blades together. Pause, and slowly lower the bar back to the starting position.
9. Seated Cable Row w/ Pause
Seated cable rows are a traditional upper-back exercise. Adding a pause for three seconds when the bar gets to your torso, however, can increase your gains. The pause keeps your scapular retractors working longer. Strengthening these muscles is important because weakness can lead to unstable shoulders—and that limits your strength and muscle gains in nearly every upper-body exercise, including the bench press and arm curl.
When you start this movement, pull your shoulders down and back. Otherwise, you'll keep your shoulders elevated, which stresses the shoulder joint. Over time, this can cause your joint to become unstable, which often leads to injury.
DO THIS: Attach a straight bar to a cable station and position yourself with your feet braced. Grab the bar using an overhand, shoulder-width grip, and sit upright. Pull the bar to your upper abs. Pause for three seconds, then slowly lower your body back to the starting position. Your torso should remain straight and motionless throughout the movement. Don't lean forward and backward to perform the exercise.
10. Pullup or Chinup Variations
If you want a V-shaped torso, you must do pullups and chin-ups. They build width because they target your latissimus dorsi (a.k.a. lats), the large back muscles that wrap around the sides of the upper body just below the arms. These muscles are the ones that give the torso a wider, flared shape, and can make you appear slimmer even if you haven't lost an inch around your middle.
Below is a list of variations of this classic back exercise from easiest to hardest. As you pull your chest to the bar during each rep, think about pulling your shoulder blades toward your back pockets. This will force you to use your upper-back muscles—as opposed to your biceps—to perform the move. Need more help? Follow this guide.
For each rep of this back exercise, you'll start in a dead hang and then pull your chest to the bar.
CHIN UP: Grab the bar with a shoulder-width underhand grip.
NEUTRAL-GRIP PULLUP: Grab the parallel handles of a chin-up station so that your palms are facings each other.
MIXED GRIP CHIN UP: Placing your hands shoulder-width apart, use an underhand grip with one hand and an overhand grip with the other.
PULLUP: This is the same movement as a chin up except that you grab the bar with an overhand grip that's slightly wider than shoulder-width.
START-AND-STOP PULLUP: Perform a pullup, and then slowly lower halfway down to a dead hang. Pause, then pull your chest to the bar again. Pause, now lower all the way down to a dead hang. That's 1 rep.
ISO PULLUP: Perform a pullup, but hold your chin above the bar for 10 to 15 seconds. You can do this for several reps or on the last rep of your last set of pullups.
TOWEL PULLUP: Find your hand positions for a chin up, then drape a towel over each of those spots on the bar. Grab the ends of the towels so that your palms are facing each other. Grasping the towels engages more of your forearm muscles, improving your grip strength and endurance.
11. Lat Pulldown
While you can't beat the chin up as a back exercise, the lat pulldown is also great for increasing muscle. In fact, bodybuilders swear by it. Get the most out of the move by performing the exercise at a slow, controlled tempo. You should "feel" your lats working each rep. Do 8 to 12 reps like this, making sure your upper body remains in nearly the same position from start to finish.
DO THIS: Sit down at a lat pulldown station and grab the bar with an overhand grip that's just beyond shoulder width. Without moving your torso, pull your shoulders back and down, and bring the bar down to your chest. Pause, then slowly return to the starting position.
12. Kneeling Lat Pulldown
Get more from your lat pulldown by taking it to the floor. You'll have a different base than the standard pulldown, and you won't be so tempted (or able) to ride the cable up at the top of each rep without having your knees braced. This is also a great way to master the proper form for other versions of the move.
DO THIS: Get down on your knees in front of a cable tower with the proper setup, with the bar's starting position just about as high as you're able to reach without raising yourself off the ground. Make sure to squeeze your glutes and core throughout the move to keep your position stable. Grip the bar with a pronated (overhand) grip, then use your back muscles to pull the bar down to the top of your chest. Pause for a moment, then control the bar as you allow it to return to its starting position.
13. Deadlift
When it's done right, the deadlift is an excellent back exercise. As you pick up and put down the weight, your upper-back muscles—including your rhomboids, traps, erector spinae, rear deltoids, and lats—must fire on all cylinders to keep your torso straight and your lower back from rounding. It's when you fail to engage these muscles that injuries can occur.
DO THIS: Load a barbell and roll it against your shins. Bend at your hips and knees and grab the bar with an overhand grip, your hands just beyond shoulder width. Keeping your lower back naturally arched, pull your torso up and thrust your hips forward as you stand up with the barbell. Lower the bar to the floor and repeat.
14. Kettlebell Swings
Kettlebell swings work more than just your back's posterior chain—the move works the front of your core, too. You can start with a lightweight to really nail the form, then graduate to heavier loads to develop explosive power and body control.
DO THIS: Start with a kettlebell on the ground slightly in front of you. Stand with your feet shoulder-width apart. Hinge at your hips and bend your knees slightly to grasp the weight with both hands in an overhand grip, but resist the temptation to bend your knees to squat. Keep your spine aligned and your core tight.
Pull the weight back between your knees, as if you're snapping a football. Swing the kettlebell up by exploding through your hips, straightening your knees, and squeezing your back. Don't allow the weight to swing above your shoulders. Swing powerfully back down between your legs to repeat, maintaining the form.
15. Front Squat
You probably didn't expect to see a squat variation on the best back exercises list, but front squats are an excellent way to build the upper back. Because the barbell is placed in front of your body, your back muscles must work overtime to keep your torso upright so you don't tip forward. As you lower down into the squat, keep strict form. Maintain a tall chest and keep your upper arms parallel to the floor throughout the entire movement.
DO THIS: Grab a barbell with a shoulder-width grip and place it in front of you across the tops of your shoulders. Now raise your upper arms until they’re parallel to the floor, allowing the bar to roll back onto your fingertips. Without letting your elbows drop, lower your body by pushing your hips back and bending your knees until your thighs are at least parallel to the floor. Push your body back to the starting position.


No comments:
Post a Comment